Create your own chatbot
In this article, you will learn how to create your own chatbot to generate automated responses to a user’s input using Python, ChatterBot Python library and Django web framework.ChatterBot uses machine learning algorithms to produce different types of responses. At the end of this article you are able to create your own chatbot.
Prerequisites
- Python
- ChatterBot Python library
- Django - Python web framework
Step-1: Create a Django Project
In visual studio create a new project using Django project template as shown in the below screenshot and name the project as "MyOwnChatBot".

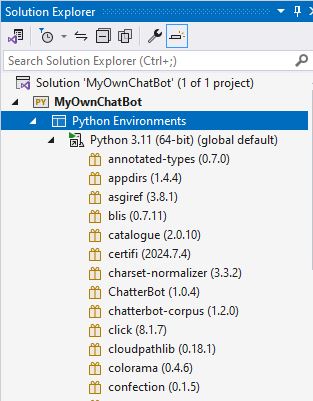
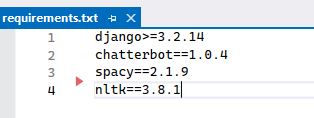
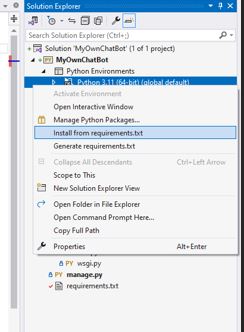
Add the required Python packages to your project "requirements.txt" file and right click on the Python version configured in the virtual environment and click "Install from requirements.txt" to install Python packages added in the "requirements.txt" file.
Step-2: Create Chatbot instance and train your Chatbot.
Add a python file to your project and name it "chatbot.py" and include the code shown below. The code will import the chatterbot and create an instance of chatbot with the name "MyOwnChatBot". Also it will add the training data from "data.txt" text file in your project's base directory sub folder named "train_data". When creating the chatbot instance you can optionally add logic adapters and storage adapters to provide the logic for how your chatbot selects a response to a given user input and to connect different storage technologies.If the storage adapter is not specified in your constructor, the SQLStorageAdapter will be used automatically.
from chatterbot import ChatBot
import spacy

spacy.cli.download("en_core_web_sm")
spacy.cli.download("en")

chatbot = ChatBot( 'MyOwnChatBot')

from chatterbot.trainers import ListTrainer

trainer = ListTrainer(chatbot)

import os

BASE_DIR = os.path.dirname(os.path.dirname(os.path.abspath(__file__)))

training_data_quesans_path = os.path.join(BASE_DIR, 'train_data', 'data.txt')

training_data_quesans = open(training_data_quesans_path).read().splitlines()

training_data = training_data_quesans

trainer.train(training_data)

from chatterbot.trainers import ChatterBotCorpusTrainer

trainer_corpus = ChatterBotCorpusTrainer(chatbot)
Step-3: Create training data.
Create a folder called "train_data" in the source code folder and place the "data.txt" file shown below or create your own training data in text file and save it in the "train_data" folder.
What is your name?
My name is MyOwnChatBot.
Can you book a vacation to India?
Yes, your vacation to India is booked.
Can you book a vacation to Hawaii?
Yes, your vacation to Hawaii is booked.
Thank you.
You are Welcome.
Step-4: Add the chat UI.
Add a html page in templates folder and name it "chat.html". Copy the below code and add it to the "chat.html". This code will create a UI with text box for user to interact with chatbot and to display automated response from the chatbot.
Add a style sheet and a java script file in the static content folder and name it "chat.css" and "chat.js". Copy the below code and add it to "chat.css" and "chat.js" files.
html {box-sizing: border-box;}

*,
*:before,
*:after {   margin: 0;    padding: 0;  box-sizing: inherit;}

body { display: flex;    justify-content: center;    align-items: center;
    height: 100vh;    background-image: var(--body-bg); font-family: Helvetica, sans-serif;}

.msger { display: flex;    flex-flow: column wrap;    justify-content: space-between;
    width: 100%;    max-width: 867px;    margin: 25px 10px;    height: calc(100% - 50px);
    border: var(--border);    border-radius: 5px;    background: var(--msger-bg);
    box-shadow: 0 15px 15px -5px rgba(0, 0, 0, 0.2);}

.msger-header {    font-size: medium;    justify-content: space-between;
    padding: 10px;    text-align: center;    border-bottom: var(--border);
    background: #eee;    color: #666;}

.msger-chat {   flex: 1;    overflow-y: auto;
    padding: 10px;}
.msger-chat::-webkit-scrollbar { width: 6px;    }

.msger-chat::-webkit-scrollbar-track { background: #ddd;    }

.msger-chat::-webkit-scrollbar-thumb {background: #bdbdbd; }

.msg {    display: flex;    align-items: flex-end;
    margin-bottom: 10px;}

.msg-bubble {    max-width: 450px;    padding: 15px;    border-radius: 15px;
    background: var(--left-msg-bg);}

.msg-info {    display: flex;    justify-content: space-between;
    align-items: center;    margin-bottom: 10px;}

.msg-info-name {margin-right: 10px;font-weight: bold;}

.msg-info-time {font-size: 0.85em;}

.left-msg .msg-bubble {border-bottom-left-radius: 0;}

.right-msg { flex-direction: row-reverse;}

.right-msg .msg-bubble { background: var(--right-msg-bg);
        color: #fff;  border-bottom-right-radius: 0;    }

.right-msg .msg-img { margin: 0 0 0 10px;   }

.msger-inputarea {   display: flex;    padding: 10px;
   border-top: var(--border);    background: #eee;}

.msger-inputarea * {      padding: 10px;        border: none;
        border-radius: 3px;        font-size: 1em;    }

.msger-input {flex: 1; background: #ddd;}

.msger-send-btn {    margin-left: 10px;    background: rgb(0, 196, 65);    color: #fff;
    font-weight: bold;    cursor: pointer;    transition: background 0.23s;
}
.msger-send-btn:hover {  background: rgb(0, 180, 50);    }

.msger-chat { background-color: #fcfcfe;}
Step-5: Add definition of urls.
Add definition of urls in "urls.py" as shown below. Copy the code and and add it in "urls.py".
from datetime import datetime
from django.urls import path
from app import forms, views
urlpatterns = [
    path('', views.home, name='chat'),
    path('get', views.get_response, name='get')
]
Step-6: Run the application.
Run the application and interact with your chatbot. At the first run the chatterbox will create a SQLite database to save and to retrieve chat history to provide best responses to user in the source code folder. The below is the screenshot of the chatbot developed following the steps in this article.

Congratulations, you’ve successfully completed the article and built a chatbot using the Python, ChatterBot library and Django web framework.